I really liked the recent Azure Active Directory(AAD) integration on Visual Studio 2013. It enables to add AAD authentication to your projects. Vittorio talked about that in his post. I tried that and added some screenshots for you to show the process for WebAPI publishing at Azure Websites.
First step is to get Visual Studio 2013: You can follow the links at http://www.microsoft.com/visualstudio/eng/downloads to get the initial version. I am assuming you want to create a webapi project for your mobile platform.
Figure: Add project
After clicking ok button, you will see new button there in the web projects. When you click "change authentication" button, you can set the organizational account at active directory that you created at Azure AD. It is very easy to add Azure Active Directory, if you have azure subscriptions. You can look at this tutorial to see about adding Active Directory at Azure.
Figure: Project list
Once you clicked the "change authentication" button, you need to enter your admin user at Azure Active Directory(AAD). This is not your live account. It needs to be your admin user at AAD. If everything looks good, Visual Studio 2013 will create your WebAPI project and add entries to Web.config file. It is using Owin, so you will see related references added to your project. You will also see startup file inside App_Start folder.
Figure: Login screen to enter AAD admin user credentials
Figure: Startup file for configuration
You can publish this project to Azure Website easily. You can use default ValuesController to test the process and later add your implementation for different controllers. Default endpoint will ask for token at "/api/values/". If you remove "authorize" attribute form controller, it will not check Tokens in the request. With simple authorize attribute, you will have all the logic to check tokens inside the coming requests.
To create Azure website, you can go to Azure portal and click wizard to create the website:
Figure: Azure website
After your website is created, you can get the publish profile as shown below:
Figure: you can click link to get the profile
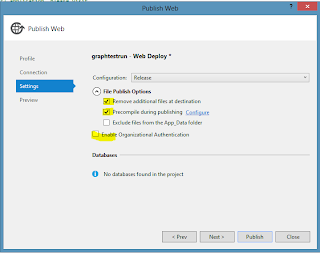
You can publish the webAPI project by right clicking the publish button at your project You need to set correct publish settings, if you don't want your config to be changed at publication.
Figure: Publish settings
You deployed a sample app to your Azure Active Directory and it is ready to be used by your AAD users. You will see one entry in the Azure Active Directory for your app. ClientID, ClientSecret and RedirectUri and permissions are important things to configure for your app. I will talk about those configuration in next posts and how to use WebAPI in different platforms. Stay tune!


