Saturday, June 23, 2012

Metaprogramming in Ruby

Ruby is a dynamically typed language. You can define methods and classes at run time. Ruby has several metaprogramming styles.

One way is to use "define_method":

#defining new class
c = Class.new
c.class_eval do
    define_method :hi do
        puts "hello say hi"
    end

    define_method :get_price  do |productname, location|
      puts "4$ for product #{productname} #{location}"
    end

    #method with default location
    define_method :get_price_2  do |productname, defaultlocation="rr"|
      puts "4$ for product #{productname} #{defaultlocation}"
    end


end

c.new.hi
c.new.get_price("bike","charlotte")
c.new.get_price_2("bike" )
c.new.get_price_2("bike","not rr" )
Prints:
hello say hi
4$ for product bike charlotte
4$ for product bike rr
4$ for product bike not rr

Inside this code block, we are creating a new class with three methods. First method is not taking any parameter. Second method is  taking two parameters. Third method is taking two parameters and last parameter is with the default value.

Another method for metaprogramming is using eval keyword. You can compile any string into a code. That is scary and somewhat crazy to me. It might be good for Artificial Intelligence projects, but not much useful for production application that you need to maintain and troubleshoot.


class MyClass
   eval %{def hi
              puts "Eval code string at runtime hello world"
          end
        }

end

d = MyClass.new
d.hi
Prints:
Eval code string at runtime hello world

This code block is taking a string and running that. You can do similar code eval syntax in javascript and php as well.

You can also define classes inside the loop and use that class outside or inside the loop.


2.times do
  class Classtimes
    puts "hello world from Class time objectid #{self.object_id} classid #{self.class.object_id} "
  end
  class Classtime2
    def printit
      puts "hello world from Classtime2 printit objectid #{self.object_id} classid #{self.class.object_id} "
    end
  end
  Classtime2.new.printit
end


Inside this code block, first class uses same object to print. Second class will create new objects for each iteration, but class will be defined once. Here is the output:

hey world from Class time objectid 18939288 classid 15445296 
hey world from Classtime2 printit objectid 18939156 classid 18939192 
hey world from Class time objectid 18939288 classid 15445296 
hey world from Classtime2 printit objectid 18938988 classid 18939192 
If you define the same class again outside of this loop, you may be wondering about the outcome. Ruby lets you extend the class,so it will use the same class to add method. It is similar to using partial keyword in C#, but you can have dynamic extensions with Ruby.

#right after 2.times block code
class Classtime2
  def printitagain
    puts "hey world from Classtime2 printitagain objectid #{self.object_id} classid #{self.class.object_id} "
  end
end
Classtime2.new.printitagain
Output:
hey world from Classtime2 printitagain objectid 18938904 classid 18939192


puts "you can look at instance methods and variables easily"
p MyClass.new.instance_variables
p MyClass.instance_methods(false)
p Classtime2.instance_methods(false)

Output:
you can look at instance methods and variables easily
[]
[:hi]
[:printit, :printitagain]


TODO for this subject:
Module extension
class << self
extending methods for single object


Monday, May 21, 2012

C# 'var' keyword versus explicitly defined variables

 If you explicitly define your variable like this:


List<MySuperEngine> lstString = new List<MySuperEngine>;


Resharper may make a suggestion to use var keyword. It helps for typing and readiblity of code. If it is not ambigous to use it, you can replace first part with var.


var lstString = new List<MySuperEngine>;


I know the type of the object, so it is obvious what we are referring to with "var" keyword. It is useful if the type name is too long to type it like

MyanotherClassWithNameSpace.ClassA obj = new MyanotherClassWithNameSpace.ClassA();


"var" keyword is not same as "dynamic" keyword. "var" is only place holder and it is for your convenience. It saves extra typing. You will have same IL code as explicit definition.


Friday, May 18, 2012

Meetup for Azure and MVC4


I like the meetup.com and created one group for Azure and MVC
http://www.meetup.com/Windows-Azure-RTP-Ninjas/

We will have first meeting on May,30th at 7pm near my office somewhere. I need to find a good room for that.


Monday, May 14, 2012

File Upload Asp.net Mvc3.0


You need to add file html element and set the form type to multipart to upload files. For example, we are sending one file to UserFileController class and upload method with Post method. When user submits ok, it will upload file directly.


@using (Html.BeginForm("Upload", "UserFile", FormMethod.Post, new { enctype = "multipart/form-data" }))
{
    <input type="file" name="file" />
    <input type="submit" value="OK" />
}

You can check request files to see their content.

public class UserFileController : Controller
{
    // Index of files
    public ActionResult Index()
    {
        return View();
    }
    
   // render the page
 public ActionResult Upload()
    {
     return View();
    }
    // Upload
    [HttpPost]
    public ActionResult Upload(HttpPostedFileBase file)
    {
        // You can verify that the user selected a file
        if (file != null && file.ContentLength > 0) 
        {
            // Filename is provided to you
            var fileName = Path.GetFileName(file.FileName);
            // you can simply save file to some folder with updated name
            fileName += Guid.NewGuid().ToString();
            //you can record some information if you want...
var path = Path.Combine(Server.MapPath("~/App_Data/uploads"), fileName); file.SaveAs(path); } // redirect back to the index action to show the form once again return RedirectToAction("Index"); } }

If you have multiple files, you can go through collection of files in the request stream to save them.


// Upload
    [HttpPost]
    public ActionResult Upload(int nothingreallyhereNeeded)
    {


try
                {
                    HttpFileCollectionBase hfc = Request.Files;
                    

                    if (hfc.Count > 0)
                    {
                        String h  = hfc.AllKeys.FirstOrDefault();
                        //multiple files
                        if (hfc[h].ContentLength > 0)
                        {
                             //we are recording info about file
                            CustomerFileRecord fileRecord = new CustomerFileRecord();
                            fileRecord.ReadStart = DateTime.UtcNow;
                   
                            Stream str = hfc[h].InputStream;
                            int fsize = 0;
                            if (str.Length > 0)
                            {
                                //just checking stream length
                                fileRecord.FileSize = (int)str.Length / 1000;
                            }
                            fileRecord.CreatedOn = DateTime.UtcNow;
                            fileRecord.Name = hfc[h].FileName;
                            fileRecord.FullName = DataFolder + fileRecord.Name;
                            hfc[h].SaveAs(DataFolder  + fileRecord.Name);
                             
                            db.CustomerFileRecords.AddObject(fileRecord);
                            db.SaveChanges();

                             
                        //do some file processing if you want.. or put into queue to process later.


                          return RedirectToAction("Index");  
} else { msg = "Empty file"; } } else { msg = "File is not attached"; } } catch (Exception ex) { logger.ErrorException("Upload data file"+ex.Message,ex); msg += "Error in processing data file: "+ex.Message; }
ViewBag.Message = msg;
return View();
}

Friday, May 11, 2012

Wednesday, May 2, 2012

Integration Service foreach file loop

Most simple integration systems use files with various formats to move data. Client drops a file to a folder for processing and your system takes that to update account balance, send email to bunch of people or send work orders. When you are working with files, you can use integration service's drag and drop features to create an integration package. BI development studio is very good for designing control flow items, data flow items and overall database integrations.

I was almost to give 5 star rating to script task feature in there, but it is hard to debug and work with. It is a good flexiblity to add your C# code inside the package you are building. It must be hard to maintain all those script code and then debug production problems.

Here are the steps to make a package for monitoring a directory and then importing data from each file.

Step1: Create a new Integration Services Project from SQL Server business intelligence development studio


Step2: Drag and drop Foreach Loop Container to Control flow

Step3: Right click in the control flow screen and select variables option to define the following variables.


  • FileRecordId: to use as a reference to your file record in the file reference table, 
  • ImportFileName: name of the file that we will record into table
  • ImportFileShortName: only filename
  • ImportFileSize: Script Task will update this variable for file size.
  • ImportFolder: to define folder for our Foreach loop


ImportFolder has predefined value and we will not change that in this demo. Other values will change

Step4:We will be processing each file in our "ImportFolder" directory and recording file info. We will use SqlTask to insert queries, Script Task to get file info and BulkInsert to add records. Now, we will drag and drop SQL Task, Script Task,  another Sql Task, Bulk Insert Task, and final File System Task. You should see this screen after dropping all those.


Step5:Now we need to define our directory folder for "FOREACH Loop container". Set foreach container enumerator to File enumerator and then click expressions. You can set property column to "Directory" from dropdown and set value to @[User::ImportFolder]


This will set the directory to our import folder variable.

Step6: We need to set read only and read write variables for script editor.
ReadOnlyVariables: User::ImportFileName
ReadWriteVariables:User::ImportFileShortName,User::ImportFileSize


You need to click "edit script" button to open script editor. I put file operations into script task to use script feature.

You can call variables with Dts.Variables["ImportFileName"].Value and use the same syntax to set the value. You should specify these variable in the readonly and readwrite variable list.

 
 public void Main()
        {

            Dts.Log("start script task", 999, null);
            //get file size
            string filepath = (string)Dts.Variables["ImportFileName"].Value;
            if (File.Exists(filepath))
            {
                Dts.Log("File exists", 999, null);
                //get size
                FileInfo flatfileinfo = new FileInfo(filepath);

                Int32 filesize = (Int32)(flatfileinfo.Length/1000);
                Dts.Variables["ImportFileShortName"].Value = flatfileinfo.Name;

                //write this size
                Dts.Variables["ImportFileSize"].Value = filesize;
                Dts.TaskResult = (int)ScriptResults.Success;
                Dts.Log("finished script task", 999, null);
                return;
            }
             
            Dts.TaskResult = (int)ScriptResults.Failure;
            Dts.Log("failed script task", 999, null);
        }

Step7: We will use SQL task to insert file info to the filerecord table.


Ole Db is using Question mark to identify input variables. You need to map variables in parameter mapping screen.

Query:
 INSERT INTO [dbo].[CustomerFileRecords]
           ([CreatedOn]
           ,[FileSize]
           ,[Name]
           ,[TotalLines]
           ,[ReadStart]
           ,[ReadEnd]
           ,[ImportedRecords]
           ,[ErrRecords]
           ,[Comment]
           ,FullName)
     VALUES
           (getutcdate()
           ,?
           ,?
           ,0
           ,getutcdate()
           ,null
           ,null
           ,null
           ,'add file info'
           ,?)

declare @i int
set @i =  scope_identity();

select  @i  as FileId


This simple query inserts a record into File record table about the file size, file name and file path. You are taking these information from Script Task and assigning to variables. Query task is using same variables to create a record. 


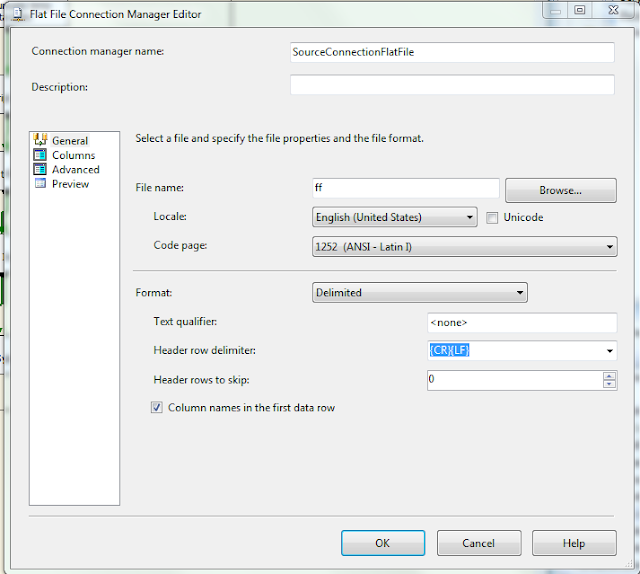
Step8: Next task is to call bulk insert to move data into temporary table. We need to define file source. You can add flat file source to use in bulk insert operation. Right click then select new connection. If you select flat file source, this screen will pop up.


File name is not important, because we will map to our variable.

Click flat file properties in the control flow screen and set connection string to "@[User::ImportFileName]"


Drag and drop bulk insert operation. You need to set source connection to your flat file source.

Set connections to your database and also set the destination table. Destination table should have same columns as your data file if you are importing data with default settings.


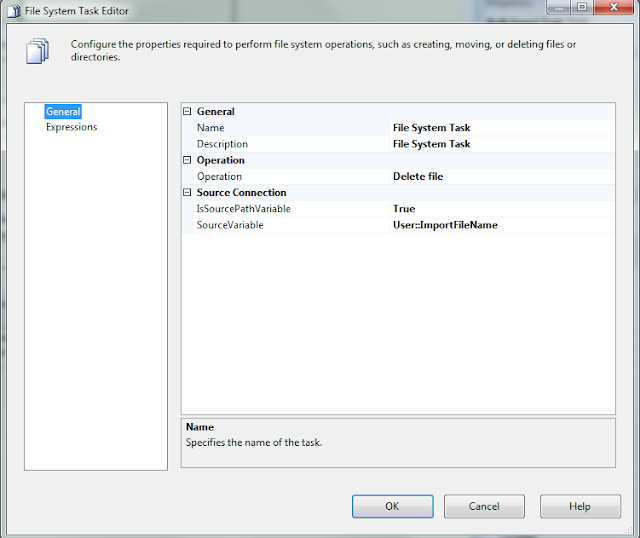
Step9: Next step is to delete the data file after processing. We will add File System Task to delete a file.

Source variable "User::ImportFileName" was populated from Foreach container.


This loop will run for each file in the specified folder and execute script and sql queries. We used sql task, file system task, Bulk insert, Script task and iterator.

You can use other tasks to add more features.

Friday, April 20, 2012

SQl server data collection feature


SQL SERver 2008 has one more nice feature: data collection feature. You can create trace profile and collect data about those collections. It manages caching ,collection cycle and all others. They created most of the options inside the management studio. You don’t need to know detailed scripts. It got some detailed steps to start. First, you need to create data warehouse db for that. It is a very nice feature to track servers.  You can create your own collections and custom reports. Creating a  collection is not in that menu. You need to use script or use sql profiler to create a collection script. See more here http://msdn.microsoft.com/en-us/library/bb677356.aspx


Here is one script to create your own data collection after going through some setup. Before running this script, read about how to setup data collection.http://msdn.microsoft.com/en-us/library/bb677179(v=sql.105).aspx:

USE msdb;

DECLARE @collection_set_id int;
DECLARE @collection_set_uid uniqueidentifier

EXEC dbo.sp_syscollector_create_collection_set
    @name = N'Custom query test1',
    @collection_mode = 0,
    @description = N'This is a test collection set',
    @logging_level=0,
    @days_until_expiration = 14,
    @schedule_name=N'CollectorSchedule_Every_15min',
    @collection_set_id = @collection_set_id OUTPUT,
    @collection_set_uid = @collection_set_uid OUTPUT
SELECT @collection_set_id,@collection_set_uid

DECLARE @collector_type_uid uniqueidentifier
SELECT @collector_type_uid = collector_type_uid FROM syscollector_collector_types 
WHERE name = N'Generic T-SQL Query Collector Type';

DECLARE @collection_item_id int
EXEC sp_syscollector_create_collection_item
@name= N'Custom query test1-item',
@parameters=N'
<ns:TSQLQueryCollector xmlns:ns="DataCollectorType">
<Query>
  <Value>select * from sys.dm_exec_query_stats</Value>
  <OutputTable>dm_exec_query_stats</OutputTable>
</Query>
 </ns:TSQLQueryCollector>',
    @collection_item_id = @collection_item_id OUTPUT,
    @frequency = 5, -- This parameter is ignored in cached mode
    @collection_set_id = @collection_set_id,
    @collector_type_uid = @collector_type_uid
SELECT @collection_item_id
   
GO

You can connect data sources to your reports inside BI studio. Their BI studio has also very nice gadgets for reports.

Test with database call and rollback your changes

This example is for MSTest. You can do the same thing for Nunit. We will have test init and test cleanup calls. Those will be called before and after each test. Whenever you define transaction scope, it will wrap your calls inside. Default scope option is Required.

We will rollback our changes at test cleanup. Of course, it will lock your records until your test completes. You could not do select statement from test table for all rows. You can read my previous post about transactions and locks in SQL.


        [TestInitialize()]
        public void MyTestInitialize()
        {
            //without any scope option. Default is Required scope option and Serializable trans type
             testTransScope = new TransactionScope();
        }
 
        [TestCleanup()]
        public void MyTestCleanup()
        {
             Console.WriteLine("Cleanup trans rollback");
             Transaction.Current.Rollback();
             testTransScope.Dispose();
        }

Our test method to add object and get that. This object will not be there after test is complete. However, your next identity value on that table will not be same.:


 [TestMethod()]
        public void CreateTest()
        {
            MailJobController target = new MailJobController();
            string name = "status for Omer" + Guid.NewGuid().ToString().Substring(0, 5);
            int id = target.AddStatus(name);
 
            Assert.IsTrue(id > 0);
 
             
        }

Our Controller method that we are testing:


 public int AddStatus(string dessert)
       {
            
               try
               {
                   // ...
                   StatusDefinition statusDefinition = new StatusDefinition() {Name = dessert};
                   db.StatusDefinitions.AddObject(statusDefinition);
                   db.SaveChanges();
                   Console.WriteLine("object id:"+statusDefinition.StatusDefinitionId);
                   
                   return statusDefinition.StatusDefinitionId;
               }
               catch (Exception ex)
               {
                   Console.WriteLine(ex.ToString());
               }
            
 
           return -1;
       }
 
        public string GetStatus(int id)
        {
            var obj = db.StatusDefinitions.Where(a => a.StatusDefinitionId == id).FirstOrDefault();
            if (obj != null)
                return obj.Name;
 
            return null;
        }


Create a Comma Delimited List Using SELECT Clause From Table Column


I should keep reference to this:


DECLARE @listIntoString VARCHAR(MAX)
    SELECT   @listIntoString = COALESCE(@listIntoString+',' ,'') +  COALESCE( color,'')
    FROM production.product
    SELECT @listIntoString, len(@listIntoString)


if column is null, we are just adding empty string.

If you want distinct colors in delimited list:


 DECLARE @listIntoString VARCHAR(MAX)
with cte as
(    select distinct color from production.product where color is not null
)
SELECT    @listIntoString = COALESCE(@listIntoString+',' ,'') +  COALESCE( color,'')
FROM cte
SELECT @listIntoString, len(@listIntoString)

Wednesday, April 18, 2012

MetadataException: Unable to load the specified metadata resource

This means that the application is unable to load the EDMX. If you see this error in your test run, it means you forgot to add your connection strings for your data context. 


Error should say something about connection string instead of that message.


Other reasons:


  • MetadataArtifactProcessing property of the model may be wrong
  • The connection string could be wrong. eDMX connection str syntax may be wrong. Copy the default and change inside.
  • You might be using a post-compile task to embed the EDMX in the assembly, which may not working for renaming.
  • May be you renamed some assembly name
For other reasons related to edmx file in your project, you may need to delete that and create that again. It will use correct Assembly names. Reset sometimes is the best way to fix things.


Get model attribute value from Controller using Reflection

C# is a nice language with those attribute decorations. You can create your own attributes and check their values for your test or for other purposes.

In MVC models, .NET framework provides data model validation attributes which inherit from Attribute class. You can get those attributes for your properties. Here is an example i just answered at stackoverflow.

We have Name property with DisplayName attribute which has public get property with "DisplayName" attribute.


public class MailJobView
    {
      

        public int MailJobId { getset; }
 
        [DisplayName("Job Name")]
        [StringLength(50)]
        public string Name { getset; }
}
public void TestAttribute()
    {
        MailJobView view = new MailJobView();
        string displayname = view.Attributes<DisplayNameAttribute>("Name") ;


    }
If you have one simple extension method, you can see the display name easily. Here, i am passing attribute type and property name for this object. You can do in a different way if you want, but reflection calls will be similar. This extension method will follow convention and lookup property in that attribute class. Property name will be class name with "Attribute" removed. If you want, you can remove constraint for inheriting from attribute class.


public static class AttributeSniff
{
    public static string Attributes<T>(this object inputobject, string propertyname) where T : Attribute
    {
        //each attribute can have different internal properties
        //DisplayNameAttribute has  public virtual string DisplayName{get;}
        Type objtype = inputobject.GetType();
        PropertyInfo propertyInfo = objtype.GetProperty(propertyname);
        if (propertyInfo != null)
        {
            object[] customAttributes = propertyInfo.GetCustomAttributes(typeof(T), true);

            // take only publics and return first attribute
            if (propertyInfo.CanRead && customAttributes.Count() > 0)
            {
                //get that first one for now

                Type ourFirstAttribute = customAttributes[0].GetType();
                //Assuming your attribute will have public field with its name
                //DisplayNameAttribute will have DisplayName property
                PropertyInfo defaultAttributeProperty = ourFirstAttribute.GetProperty(ourFirstAttribute.Name.Replace("Attribute",""));
                if (defaultAttributeProperty != null)
                {
                    object obj1Value = defaultAttributeProperty.GetValue(customAttributes[0], null);
                    if (obj1Value != null)
                    {
                        return obj1Value.ToString();
                    }
                }

            }

        }

        return null;
    }
}